More info on all the products listed can be found on my essentials page.
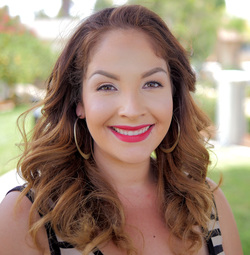
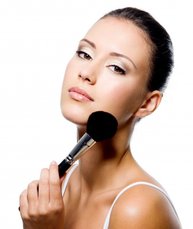
There are some things in life that come our way that make us think "how did I ever live without this before?!!" Well in the world of makeup, beauty products can produce the same reaction. I have tried countless products through the years and have my tried and true from the beginning and some that I've recently found that have changed the way I apply my makeup and have paved the way for awesome makeup days. The creators of these products must have been having a great day when these products were invented! Here are 5 products that have caused me to shout out loud like the lady in the picture "That Is Genius!!" More info on all the products listed can be found on my essentials page. 
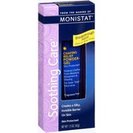
1. Monistat Soothing Care as face primer: This product always gets me crazy reactions from people when I tell them about it. First off, yes, its a product that shares its name with a product that's intended to treat, a-hem, woman issues, but that's where the similarities end! This is intended to be used as barrier for sensitive areas of our skin-inner thighs, arms, etc- that are prone to chaffing. The main ingredient is dimethicone, a silicone agent intended to provide a smooth barrier that will deter moisture to gather in the areas where applied. All face primers include this ingredient, which is what gives primers their soft feeling and helps in keeping our foundation in place and control oil and sweat from penetrating through. Basically, its the same thing! Except face primers can start anywhere from $10-$30, when this will only cost you $5.99 and will last you a very long time- a little goes a long way! A favorite among the youtube beauty guru community, this is genius! 
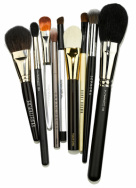
2. Real Techniques Brushes: Hands down, some of the best brushes I have ever used! Created by the dynamic sister duo Pixiwoo from youtube, these brushes have been revolutionary in the way I apply my makeup and the flawless application they give. These brushes provide a tool for every part of your face, from face to eyes, and are made with excellent handles and the softest bristles I've ever felt! They are super affordable- individual brushes range from $5.99-$9.99 and coordinating sets of 4 for $17. My favorites are the miracle complexion sponge and the . powder brush 
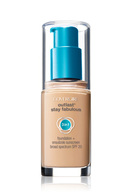
3. Cover Girl Outlast Stay Fabulous 3-in-1 Foundation: My absolutely favorite drugstore foundation ever! (even though I've probably said it before with other foundations, but this time I really mean it!) This foundation's long wearing power is amazingly great that I've come to the end of a long day and my foundation has stayed put and still looks as fresh as when I first applied it. It gives great coverage, very buildable, but still gives you that "like skin" look without the appearance of over applied makeup. My favorite part of this foundation is how amazing it holds up in the summer heat and humidity. It works great alone, but pair this with a primer (like the one shown above) and this foundation will be your best friend on those hot summer days! 
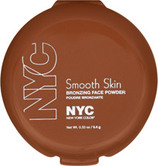
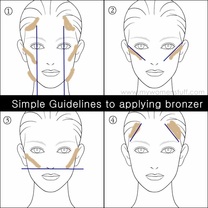
4. NYC Bronzer in Sunny: A good bronzer with all the right qualities are hard to come by, especially in the drugstore. Before I found this product, my search for the perfect drugstore bronzer felt like a never ending scavenger hunt. But oh, how things have changed since I found it! It's completely matte, finely milled and buttery soft to the touch, easily buildable, and does not leave an orange cast on the face like other bronzers can. What's great about this product is that you can also use it as an eyeshadow. I like to use it as a transition color in my crease when blending darker colors on the lids, or adding some depth to the eye when I don't want to wear a lot of eyeshadow. 
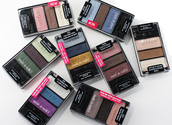
5. Wet n Wild Eyeshadows: Holy cow, are these eyeshadows awesome!! I've used these shadows since high school and they are still a favorite of mine! Affordable prices ($0.99-$4.99), great pigmentation, buttery soft, and easy to apply. Comparable to high end brands, I've found many dupes for my more expensive eyeshadows and compare their quality as same or even better as its high end competitors. An absolute must try!! What are your groundbreaking, life changing beauty products? I'd love to know!
0 Comments
Everything you need to know about brushes! I share my must have essentials and what every girl needs in her makeup kit to achieve beautiful makeup application, all without breaking the bank! Makeup is not only about the product itself, but the application process, the tools you are using and the techniques that go with it. With every masterpiece, there was a person and materials behind it. Even if the artist had the best materials available, but did not have the accurate tools needed to perform the job, the artist would not be capable of creating his or her masterpiece. This is the way it goes in the makeup world- you could have the best, most expensive "materials" (makeup) but if you don't have the right tools to apply them (brushes, sponges, etc) then all the prestige of those materials goes to waste. I've done many comparisons between high end and drugstore makeup and what distinguishes them is the way the product is applied. And even then you don't need to spend tons of money on brushes. Here are my top picks of must have brushes in your tool kit, all available for under $10. First things first- don't get stuck on name brands!!: The complaint I hear the most from women is that they feel discouraged because they feel pressured to buy well known name brand brushes in order to get a decent makeup application. This is not true! This is why I write these posts because I want to remove these common myths of makeup! Let's all say it together, "Just because it's name brand doesn't mean it's the best!!" There are many companies that make great brushes with excellent craftsmanship, durability and incredible texture at affordable prices. Some tried and true and trusted brands I highly recommend are Real Techniques, E.L.F. Studio Line brushes, and Crown Brushes, with price ranges from $3-15 a piece. Not to say that these more expensive brushes are not good, because they are, I'm just saying that there are many alternatives and even dupes for high end brushes that can be found at a much more affordable price. Top essential brushes for every tool kit: 1. powder brush 2. blush brush 3. eye blending brush 4. flat eyeshadow brush 5. fluffy eye blending brush 6. small face tapered brush 7. spoolie and angled bristle brush duo for eyebrows 8. beauty sponges 9. stiff angled eyeliner brush 10. tapered eye blending brush 11. eyelash comb 12. stippling brush This may seem a bit overwhelming, but trust me, 12 brushes is nothing compared to what many makeup artist use on a daily basis, me included! These brushes can help you achieve any look and provide you with the adequate tools to achieve a beautiful makeup application. Stay tuned for the next post where I personally share what specific brush I use and how to use it to create a professional makeup application. Do you have any brushes you'd like to add to the list? Let me know!
I 'm starting a series of posts of the most common application questions I have received through the years called Back to Basics 101. I think what gets lost in the world of beauty websites and video tutorials is the simple step by step guide to everyday makeup application- foundation, blush, lipstick, etc. In this post, I will be focusing on bronzer. Bronzer is one of the most misunderstood and poorly used products, and also one of the most overlooked. When done correctly, adding warmth to the face can create a healthy glow and dimension to our faces when achieving a great makeup look. I often get asked "how do you look so naturally tanned and get that defined look?" Well, its bronzer. To be honest, I've also committed so many of the same mistakes in learning the proper way to apply bronzer and to contour that I've been guilty of the "dirty face"- what happens when you wear too much bronzer and you look like you've been pulled through a pile of dirt! This post will offer some tips on the proper way to apply bronzer in order to achieved a contoured look that will raise your makeup application skills to the next level. For reference, I've included the picture seen on the left to help in each step and links to recommended products. 1. Matte is where it's at: When choosing a bronzer for contouring, always look for a matte bronzer without any glitter or shimmer in it. The purpose of the bronzer is to define and "pull back" those features on the face you want to slim down or make smaller (the cheekbones, frame of face, nose, etc). Any shimmer will only bring attention to the face and will have the opposite effect that a bronzer is supposed to do. 2. Brown is the new orange: For the longest time, bronzing powders and creams have been made with an orange tone, leaving your skin with an unnatural color, making you look like a stand in role as an oompa loompa in Willy Wonka's Chocolate Factory! When the sun warms up our skin, it creates a reddish undertone. What you want to find is a bronzer that has this same undertone to get the most natural look possible. Check out my essentials page to find the bronzer I use and love. 3. Avoid a heavy hand: To ensure a natural, flawless application, take your time to build up the product. Work one area at a time to avoid getting bronzer all over your face, which will defeat the purpose of contouring. Adding product in small amounts allows you to have more control over product placement and allows you to have a cushion for mistakes- its always easier to add more product than to remove it. 4. Blend, blend, blend- then blend some more: You want the bronzer to melt into your existing foundation or powder thats already on your face to create a seamless look. Blending will create an even, airbrushed look, creating the illusion of that great tan you would get after a vacation on a tropical island (which I'm still waiting for, but that's a different story). 5. Get the right tools for the job: For contouring , an angled or a small densely packed brush works great. I love using the Real Techniques Expert Face Brush for this area (see additional recommendations on my essentials page) A larger brush can be used if you're looking to just warm up your skin instead of defining through contouring, such as kabuki brush , which is a short bristle, tightly dense brush. I hope you find these tips useful in helping you achieve a beautiful bronzed, sun kissed look. Please leave your thoughts, questions, or comments on what products you'd like to see featured in this Back to Basic Series. Videos covering these topics will be coming soon, so look out for links to my youtube channel in future posts.
|
Author
When I'm not spending way too much time getting ready or drooling over the newest beauty product, I'm a stay at home mom of a rambunctious 4 year old boy, a sweet baby girl we lovingly call "sissy", and a wife to my high school sweetheart. Archives
August 2014
Categories
All
|